Install Instructions
The following architecture is required to operate the ProactiveRA dashboard
- The Dashboard can be deployed either on a Windows or Unix/Linux server
- The Backend processing scripts/File management system can be deployed on a Unix/Linux system or on a Windows machine with a Cygwin install or equivalent.
- Unix/Linux disk space. Minimum: 800Mb.
- Oracle database 9i or later. The dashboard can be deployed using Oracle Express.
- Disk space for the oracle data files. Minimum: 1Gb
- Liferay Dashboard 6.1 (download link available in the Download tab)
The sizing of the Oracle database will depend upon different criteria. For a minimal installation like a proof of concept, count for 2Gb of data-files. For a production deployment, consider the following sizing decisions.
For the Switch-to-Bill module:
- How many control-points will you deploy and how many service-types will you want to monitor at each control-point? The tool keeps hourly and/or daily statistics for each service-type monitored. The oracle table holding statistics about usage processing will grow directly proportionnaly to the number of service-types and control points monitored.
- For each control-point, how long will you hold-on to the raw CDRs? The tool keeps statistics about the processed CDRs, but the raw CDRs are also kept in the system for whenever an investigation/drill-down is required. For each control-point, a sizing exercise is required to define the overall size of the database required.
For the Data-Integrity module:
- For each platform monitored, how many subscribers are handled and how much information (how many fields and what field-length) will you extract for each subscriber?
- With what frequency will you receive platform extracts and for how long will you store the detail of each platform extract?
For the ProactiveRA dashboad deployment, create 2 separate Oracle logins:
- One for the Revenue Assurance specific tables (ex: RA)
- One for the internal tables of the Liferay dashboard (ex: LIFERAY)
The scripts provided in the generic release assume a simple division in 2 tablespaces: RA_DATA (tablespace reserved for the creation of the tables and stored procedures) and RA_IDX (tablespace reserved for the creation of all the indexes). If you need a more specific tablespace structure with partitioning, adjust the scripts accordingly.
To complete the database install, connect using the RA login and create all the different tables, indexes and stored-procedures using the scripts provided. For each control-point that you want to monitor, deploy the ad-hoc tables according to the templates provided.
Deploy the scripts in the unix-directory of your choice by simply unzipping the provided release. It is recommended to create a dedicated unix/linux login (ex: ra) and to deploy both the scripts and the backend file processing structure in a root directory owned by this user.
The following environment variables are required by the scripts and should be set at login:
- UID_RA: the user name to use to connect to the RA database created.
- DB_RA: The SID of the RA database created.
Edit the file "Common/lib.ksh" to point to your deployment (where your backend directory structure is):
- root_dir: This variable should point to the root directory of your backend file processing structure (ex. $HOME/ProactiveRA/backend)
2 files are storing database passwords and should also be edited:
- ".PASS_RA": should contain the password of the RA database. Leave read/write permissions on this file to only the unix owner.
- ".PASS_BILLING": should contain the password of your Billing database (ignore if the tool is not expected to be configure to connect to the Billing database). Leave read/write permissions on this file to only the unix owner.
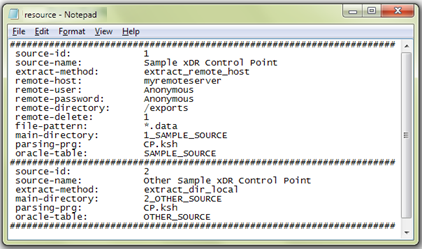
Configure the properties of each control-point in the resource file: "resource.dat", for each module.
Refer to the Liferay website for basic pre-requisites and install instructions on how to deploy the standard Liferay dashboard. The following section will detail how to integrate the ProactiveRA's specific portlets in a standard deployment, assuming the dashboard has been deployed with a Tomcat bundle.
Edit the following Tomcat configuration files:
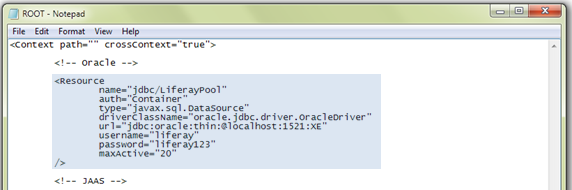
- "tomcat-7.0.23/conf/Catalina/localhost/ROOT.xml": Add the JDBC oracle connection to the RA database. This is the connection that Liferay will use to create and manage its internal tables.
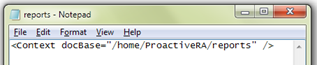
- Create a new file "tomcat-7.0.23/conf/Catalina/localhost/reports.xml". This file will contain the directory where all external reports should be stored. The dashboard will scan this directory to present the reports via the portlets.
- Update the file "tomcat-7.0.23/conf/context.xml".
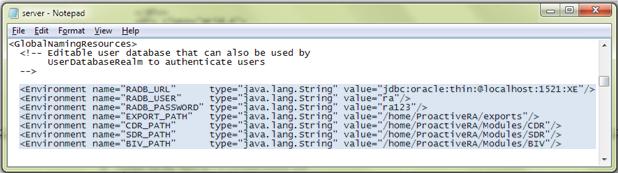
- Update the file "tomcat-7.0.23/conf/server.xml" with the directories according to your deployment.
- Deploy your Oracle JDBC library (ex: ojdbc14.jar) under the tomcat-7.0.23/lib/ext directory
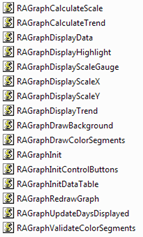
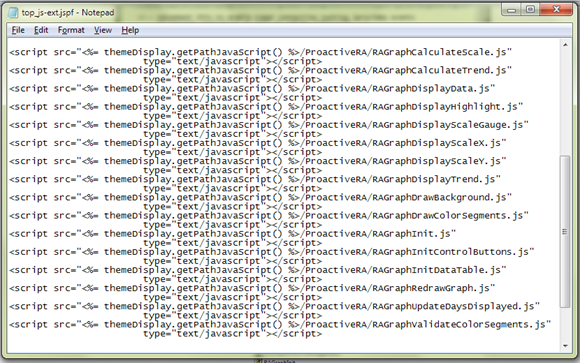
- Deploy the provided Java Scripts library under the tomcat-7.0.23/webapps/ROOT/html/js/ProactiveRA directory
- Update the file tomcat-7.0.23/webapps/ROOT/html/common/themes/top_js-ext.jspf
- Deploy all the released Portlets under the directory tomcat-7.0.23/webapps

Launch the dashboard with the startup script in tomcat-7.0.23/bin
Connect to the Dashboard using the default admin user, configure users, pages to your liking using all the available resources!
Having a question/problem with the install?
Submit your question here